Monday, November 28, 2011

Turkey Tortas (Tortas de Pavo)

One of my favorite things to do on Saturday is to go downtown in Mexico City.  With the cheap shops selling everything from light bulbs to fresh chicken and my favorite market to buy fruits and vegetables, it is one of the best parts of my week.  

On my first trip there, my husband said that we needed to stop at a torta place he really enjoyed for lunch.  Tortas are a specific style of sandwich that you can buy everywhere in Mexico City, with this particular stand specializing in turkey tortas.  The first time I had that warm toasted sandwich containing turkey, avocado and chipotle, I knew what I would be doing with this year's leftover Thanksgiving turkey.

The first thing is to assemble your ingredients...


- Sliced turkey
- Vegetable Oil
- Rolls (as many as you like)
- Can of refried beans
- Can or bottle of chipotle in adobo sauce 
- 1 to 2 ripe avocados
- Butter or sour cream


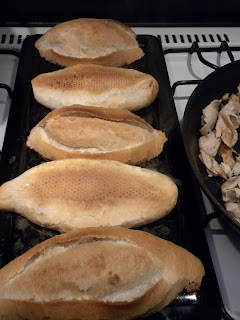
For the bread, I went to our neighborhood bakery, but feel free to just go to the grocery store.  I think this type of bread is fairly easy to find - just keep in mind, this is not a french-bread type roll, it is a much lighter and less dense than that.


Heat about 1 Tb of oil in a skillet.  When hot, add the turkey and cook until you see some light browning.

Meanwhile, slice the rolls in half and remove some of the fluffy bread from both halves.


Smear a thin layer of canned refried beans on one half of the roll.  You want to be a little generous and cover the entire inside of the roll.


On the other half, you spread a very thin layer of sour cream (more traditional) or butter.


 Place both halves face side down on a heated comal or skillet and lightly toast.


Flip them over and either remove from heat (preferred) or turn off the heat.


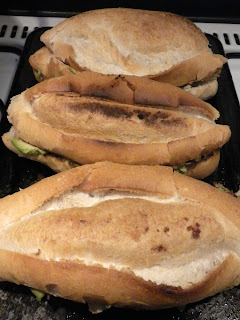
 Place the heated turkey on one side followed by slices of avocado.  On the other side, put some chipotle in adobo.  I would recommend tasting the chipotle before deciding how much to add, as it can be very spicy (especially the canned variety.)


Close your delicious sandwich and lightly toast on both sides before serving.


Serve with extra chipotle in adobo sauce or jalapenos (you can substitute jalopenos for chipotle in the sandwich as well, if you like.)

Happy Turkey Eating!
~ Kim

Sunday, November 20, 2011

How My Favorite Food Critics Disappointed Me...

I was really excited when looking on The Splendid Table's website, that several restaurants and food-related places were listed for Mexico City.  And even better was that Jane and Michael Stern, the authors of the amazing 500 Places to Eat Before It's Too Late, compiled the list.  So, I started with high hopes that I would find some new places to visit in Mexico City.

As I began to ask Ismael about the list, the conversation went something like this...

Kim: "Have we been to Cafe Azul y Oro?  That name sounds familiar..."
Ismael: "Of course, that is the restaurant I took you to in the University."
Kim: "Oh, how about La Pasteleria Ideal?"
Ismael: "That is where we bought our wedding cake."
Kim: "Oh, well then... El Tizoncito?"
Ismael: "Do you remember the first place I took you to eat tacos in Mexico?  The place in Coyoacan?"
Kim: "The place right across from the artisan market?  I remember that.  Ok, have we been to Jamaica Market?"
Ismael: "Yes, once, that is where we went with my friend to buy flowers."
Kim: "Oh, well the only one left is Pujol, do you know about that place?"
Ismael: "Yes, it is a restaurant, but I heard there is a better one... I just can't remember the name of it right now..."

Needless to say, I was a bit saddened by the demolition of my hopes for discovering new places to go.  On the bright side, this means Ismael is taking excellent care of me, and that if Jane and Michael Stern ever want a local guide to the city, they are welcome to contact me.  Ismael and I would be happy to share where the best tacos in Mexico City can be found.

Saturday, November 19, 2011

Last Year's Pumpple

Those of you who knew me in grad school, especially my food science friends, may remember the amazingly-insane Pumpple cake that I made for the Food Science Department's Thanksgiving lunch last year.  (Don't lie, I know you wished I could have been there this year, as well.)  As the original creator made this in honor of Thanksgiving, I figured now was a great time to talk about it.

The original version of this amazingly ridiculous dessert was the Cherpumple.  It was dreamed up by Charles Phoenix as the answer to people wanting a little of each dessert at Thanksgiving.  He came up with a dessert that incorporated Cherry Pie, Pumpkin Pie, Apple Pie, hence the name Cherpumple, along with Spice Cake, Yellow Cake, and White Cake, all covered in a Cream Cheese Frosting.  I mean really, what more could you want from a dessert?

Mine was a bit more simple as it consisted of only two layers: a Pumpkin Pie baked inside a Chocolate Cake and an Apple Pie baked inside a spice cake, with that obligatory cream cheese frosting made with a real vanilla bean.  I love yummy black vanilla specks.


The reality is that it is not that hard to make, it just takes way-too-long.  But last year with the stress of not knowing if I would finish my thesis, I needed to do something moderately insane to blow off some steam.  So... I got out the baking pans.

First, you need to bake and fully cool whatever pies are going to be going into your amazing creation.  For me, that was a pumpkin pie and an apple pie.  Then, you make a half-recipe each of chocolate cake batter and spice cake batter.  Next, you grease two (deep) 9-inch pans, put in half of your chosen batter, carefully put in the whole pie, and cover it with the other half the batter.  For the pumpkin pie I used chocolate cake, while spice cake was a natural for the apple pie.  Bake your layers, cool them, and make the cream cheese icing.  Finally, you frost your monstrosity and take this dessert to an event with at least 20 people, who can help you finish it off.

It was delicious ~ and the most amazingly ridiculous cake I have ever made in my life.  (A close second was your wedding cake, Jessie.)

~ Kim
BTW, the video from the original creator is hilarious and not-to-be-missed!  Check it out here.

Friday, November 18, 2011

What to Do With Nopales... (Part 2)

I will admit it, I really like nopales.  

Along with them being very cheap here (12 pads for about 80 cents), they are highly nutritious, and easy to prepare.  All these characteristics, as well as their being the prime ingredient in one of my favorite breakfasts, make them a staple in my house.

So on that note, I think today is a great time to show you my very favorite way of preparing nopales.

Nopales Con Huevo (Cactus with Eggs)
Adapted From: The Essential Cuisines of Mexico by Diana Kennedy*
2 Tb Vegetable Oil
1 lb Nopales (about 5-6 medium pads), cleaned and diced (3 1/2 cups)
3 Roma Tomatoes (8 oz), finely diced (1 1/3 cups)
2 Garlic Cloves, finely chopped
1/3 cup White Onion, finely chopped
2 Serrano Peppers (small), finely chopped**
Salt to taste
3 Large Eggs


Assembly all the ingredients along with a large cutting board and your favorite chopping knife.


Dice the cleaned nopales into medium sized pieces.


Finely dice the tomatoes, onion, garlic, and serrano peppers.  Heat the oil in a large (12 inch) skillet.


Put all the vegetables into oil in the heated skillet.  Add salt to taste (approximately 1/2 to 1 tsp).  Stir to mix the ingredients and cover the pan.  (You need to trap the steam to properly cut the nopales.)  Cook over medium heat, occasionally stirring the vegetables (only 3-4 times) for about 25 minutes, until the mixture is dry and well seasoned.


The nopales will undergo a color change from bright green to this dull hue.  This color change, along with the evaporation of all the liquid that was released from the vegetables, indicates that they are ready for the next step.


Crack three large eggs directly into the skillet.  Stir the eggs to mix in and continue stirring until set.


Once you have the finished product, you can eat them on their own or as a filling for tacos.  And while I love them for breakfast, there is nothing wrong with serving them for lunch or a light dinner.


For this breakfast, I served them with blue corn tortillas, but any type of corn tortillas would work well.

Buen provecho!
~ Kim

*Many thanks to my friend Shauyi and her brother George for buying me this book as my wedding gift.  They win the "Most Needed Gift that I Had No Idea Existed" Award.
**Two small serrano peppers give this a nice bite, if you are not a fan of spicy, feel free to just use one - so you can have some flavor.  Or if you love spiciness, you could go up to four, as was in the original recipe.  Just be warned that the same type of pepper on any given day can have a very different level of spiciness.  And a little can go a long way.

Tuesday, November 15, 2011

What To Do With Nopales...

Before moving to Mexico City, I am not even sure I saw the cactus that I know was for sale at the local Mexican Grocery stores.  I think my eyes had a way of flowing over them, ignoring them as best I could, along with the other unidentifiable fruits and vegetables.  After all, then I was on a mission to find cheap vegetables for American recipes.

Things have of course changed since moving to Mexico.  Living here, one of my goals is to use the locally grown fruit and vegetables.  This aim is both due to my desire to eat as a native and that these are very, very cheap - as low as 20 cents a lb cheap.

During one of our trips to the market, Ismael came back with a bag of cactus.  I looked at him blankly and asked what I was suppose to do with them.  He simply replied that he would show me how to prepare it.

What he showed me is the recipe I would like to share with you today.

The Easiest Nopales Ever 
Nopales (as many as you like)
Salt
Non-stick Pan

First, you are going to need to clean the nopales.  Now unless you are living in Mexico, or you have a truly awesome Mexican Grocery store near you, your nopales are going to be covered in small, sharp thorns.  With a sharp, medium-sized knife carefully scrap down against the nopales' flesh, removing the thorns.  You also need to cut the around the outer rim of the nopales to remove the thorns there are well.  As the thorns are very sharp, I recommend using a plastic or rubber glove, if you have one.  Otherwise, some folded paper towels may help you out.  Thankfully, this is the hardest part.

When you are done, your nopales should look something like this.

Now, using your knife, you need to make 3 or 4 cuts into each nopal, going about 3/4 of the way down. Spread a little salt into the cuts and over the nopales for flavor.


Place your nopales on a preheated non-stick skillet or a comal.


 After a few minutes, flip them over and cook both sides until they look like the ones below.


After cooking, the nopales still retain a firm texture and a bit of crunch.  Their flavor is slightly acidic, but overall mild, not too different from tart green beans.  While the flesh that touched the comal is dry, the cut areas can be a bit sticky - similar to okra.

My favorite way to enjoy this type of nopal is in a warm corn tortilla with meat, lime, and salsa, but you can also have it as a side dish or even as a hamburger topping.

I hope you have a chance to enjoy this easy and traditional dish.

- Kim

Monday, November 14, 2011

A Halloween Party In Mexico City...

As you may know, Halloween is not celebrated much here in Mexico City - the country is much more interested in the following two days, the 1st and 2nd of November, during which they celebrate Day of the Dead (Día de Muertos).  

During Día de Muertos, Mexicans hold a huge party as they believe that their dead relatives can come back during these two days to visit the places they once lived.  In honor of this occasion, each family puts up an offering of food and drinks that their deceased loved-ones enjoyed during their life.  Traditionally, tamales, Día de Muertos bread, and sugar skulls are the most popular offerings.  The belief is that during the night, when everyone is sleeping, the ghosts can come visit the offerings, only taking up the offerings' scent.

It was a fascinating experience to see everywhere you went - schools, markets, on the streets, or in people's houses - these offerings.  Many places have Mega-offerings, where groups of people work together to create huge offerings of food, and even art, for the ghosts to enjoy.

Of course, as this culture is new to me, what I really wanted was a good old-fashioned Halloween party... one that of course included pumpkin carving.  Thankfully my friends at my Spanish language school where happy to oblige.  I think for all of them it was their first time to carve pumpkins - and they created some masterpieces.

I, naturally, was super excited that this party gave me the perfect excuse to search online for some crazy, weird food to make for the party: a Pumpkin-shaped Veggie Tray, Witches' Mouths, Mummy Dogs, Meatloaf Cupcakes, Peanut Butter Ghosts, Slimy-Orange Punch, and lots of sugar cookies - to be decorated at the party.


Jack-o-Lantern Veggies consist of a carrot-body, cucumber mouth, a broccoli stem, and your favorite veggie-dip for the eyes and nose.  I used an easy Cucumber-Curry Dip I found in one of my favorite cookbooks -The America's Test Kitchen Family Cookbook.

Cucumber-Curry Dip Makes about 1 1/2 cups
3/4 cup mayonnaise
3/4 cup sour cream
1 Tb fresh lemon (or lime) juice
1/2 cucumber, seeded and chopped fine
1 Tb curry powder
1 Tb minced fresh cilantro
Salt and pepper

Stir all of the ingredients together and season with salt and pepper to taste. Refrigerate the dip for at least 1 hour to allow the flavors to blend. The prepared dip will keep, covered and refrigerated, for up to 2 days.  Season with additional lemon juice, salt, and pepper before serving.


Witches' Mouths is a fun and delicious concoction consists of red apple slices, creamy peanut butter, and mini-marshmallows.


Now, Mummy Dogs are really something to get excited about.  For the first one, a modified pretzel dough is wrapped around half a hotdog with mustard for the eyes.  


The second one was my husband's idea: you tear some Oaxaca Cheese into long strips which are wrapped around the mummy, using a hot knife (be careful!) or a flame to sear the end of the cheese strip to the rest of the cheese.  What made these so fun was the shreds of cheese made an excellent imitation of the mummy's cloth-bands.


Peanut Butter Ghosts (Modified from Spooky Eyeballs)  When I saw the Ghost version of this treat, I had to make it - so cute!  I did add 2 cups of Rice Krispies and took the suggestion to freeze the shapes before dipping them.  Just like another version of Buckeyes (Go Ohio State!)
Note: If you make the linked Buckeyes recipe, I highly recommend adding in a Tb of vanilla extract - it makes them extra addictive.


Slimy-Orange Punch (seen in the bottom left-hand corner) is a sweet, additive concoction of pineapple juice, orange gelatin, orange juice, ginger ale, and orange sherbet (though I used lime sherbet, as that was all I could find.)

In this picture, you can also see my Halloween-Shaped Sugar Cookies.  As I now live at a very high altitude, I recommend this recipe.

Sadly, my Meatloaf Cupcakes were so in demand, that I did not get a picture of them.  But feel free to take a look at the blogger that inspired that creation (I did use her recipe for the mashed potatoes, but the meatloaf recipe follows - and if you want a good meatloaf recipe, look no further.)

All-American Meatloaf from America's Test Kitchen Family Cookbook
Serves 6 to 8
1 Tb vegetable oil
1 onion, chopped fine
2 garlic cloves, minced
1/2 tsp dried thyme
1/2 cup ketchup
1/4 cup packed light brown sugar
4 tsp cider vinegar
2 large eggs
1/2 cup milk, plus extra as needed
2 tsp Dijon mustard
2 tsp Worcestershire
1 tsp salt
1/2 tsp perpper
1/4 tsp Tabasco
2 lbs meatloaf mix (equal parts ground beef, pork, and veal or 1 lb 90% lean ground beef and 1 lb ground pork)
2/3 crushed saltine crackers or 1 1/3 cups fresh breadcrumbs
1/3 cup minces fresh parsley


1. Adjust an oven rack to middle position and heat oven to 350 degrees.  Heat the oil in an 8-inch nonstick skillet over medium heat until simmering.  Add the onion and cook until softened, about 5 minutes.  Stir in the garlic and thyme and cook until fragrant, about 15 seconds.  Set aside to cool for 5 minutes.
2. Meanwhile, mix together the ketchup, brown sugar and vinegar and set aside.  In a separate bowl, mix the eggs, milk, mustard, Worcestershire, salt, pepper, and Tabasco together.
3. Mix the meatloaf mix, crackers, parsley, sauteed onion mixture, diced pear and egg mixture until evenly blended and the mixture doesn't stick to the bowl (if the mixture sticks, add additional milk, 1 Tbsp at a time until it no longer sticks).
4. Turn the meat mixture onto a foil-lined baking sheet and shape into a 9X5-inch loaf.  Brush with ketchup mixture.  Bake the loaf for 45 minutes to 1 hour.  (Alternatively, form tennis ball-sized rounds of meatloaf and put them into a greased muffin tin and flatten slightly.  Spread about 1 tsp of sauce over each ball and cook for about 30 minutes.)
5. Brush the loaf with the remaining ketchup mixture and continue to bake until the center of the loaf is 160 degrees, about 15 minutes. Let cool for 20 minutes before slicing and serving.

The nine pumpkins made during the party.


This carved pumpkin was the talk of the night - winning the "Most Mexican" Award.  If you cannot tell, it's creator stuck a 200 peso note in its mouth, about a $16 USD bribe for the judges.

I loved making these crazy recipes and can't wait until I get to do it again next year.  If you have any suggestions for what I should try next, please let me know!

~ Kim

The Beginning of the Adventure

Welcome to my long-awaiting for cooking blog!

Well, I think at least a few of you have been hoping that I would do this... maybe four of you?

To bring everyone up to date, in July of this year, I married my amazing husband Ismael and moved to his hometown of Mexico City.  Since then, I have been taking 4 hours of Spanish class every weekday, setting up a new house, exploring the city, and, of course, learning how to cook Mexican food.

I am hoping this blog will be a combination of some great Mexican recipes, some old favorites from the US, and some insight into the Mexican culture and lifestyle.

So far, I have really enjoyed my time living here and I am hoping to share some of the things I love with you.

~ Kim